LiteSpeed Cache is one of the best caching plugins for WordPress on the market today. It is optimized to be used with LiteSpeed Web Server, but it can also run on other web servers such as Apache or Nginx. LSCWP has a lot of speed optimization features, so it is an excellent option in enhancing website performance.
What You Will Learn In This Article How to Speed up Your WordPress Site with the LiteSpeed Cache Plugin and its Features To Speed Up your site, you can use the following guide below:
1. Installing and Setting Up LiteSpeed Cache Plugin
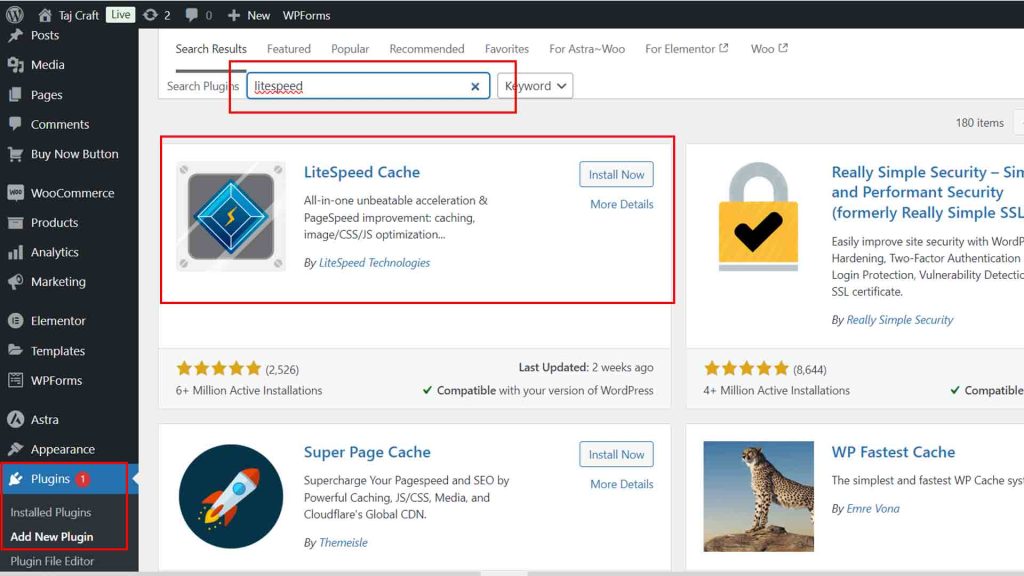
You will have to install and activate the LiteSpeed Cache plugin prior to going into key optimization settings.
Installation:
- Login to WordPress Dashboard.
- Go to Plugins > Add New.
- Search for LiteSpeed Cache.
- Click Install and Activate after installation.

Initial Setup:
When enabled, LiteSpeed Cache Configuration will show up in your WordPress dashboard at LiteSpeed Cache > Settings.
2. General Settings:
Go to LiteSpeed Cache > Settings > General This is where you can enable/disable the basic functionalities of the plugin:
- Activate Caching: Make sure this is On to turn on caching in LiteSpeed Cache.
- Auto Upgrade: This needs to be activated, so that you get updates from the LiteSpeed Cache plugin automatically.
- Domain Key: If You Use QUIC by LiteSpeed If you are using cloud CDN, here you need a domain key.
3. Cache Settings:
One of the most important things done to increase page speed is Caching. LiteSpeed Cache LiteSpeed Cache is another excellent caching plugin for WordPress.
Basic Cache Settings:
- Navigate to Cache > Cache:
- Use Cache: Enable this action.
- Cache Logged in users: Enable only if you have a Membership or Forum Site where users need to log in.
- With Cache Commenters, when a user makes a comment, you can cache the output for all the commenters on the post to spare those users from that query.
- Cache REST API: If you would like to hasten the REST API requests include here.
- Cache Mobile: If the cache is active even for mobile device content.
TTL (Time to Live) Settings:
- Cache > TTL — Set the time period that each type of content should be cached.
- Default Public Cache TTL: 604800 seconds (7 days) — this is a good default value.
- Private Cache TTL: Unless you have some use case — set it to 1800.
- Front Page TTL: Balance between freshness and performance, can be set 3600 seconds (1 hour)
4. LiteSpeed Cache is a WordPress speed optimization plugin from LiteSpeed Tech.
This is how much the images are typically weighing down a page. Optimize Images for Faster Loading Time With LiteSpeed Cache
Image Optimization Settings:
- Visit LiteSpeed Cache -> Image Optimization.
- Send Optimization Request(Automation) It will send your images to LiteSpeed image server for optimization.
- Auto Request Cron will automatically request optimization of new images.
- Activate Auto Pull Cron to get the images optimized back to your site.
- LiteSpeed also supports WebP, a modern image format that is both faster and smaller than traditional PNG or JPEG.
- WebP Replacement: This checkbox allows you to auto-serve webp images if it is supported in a browser.
5. Minification & Concatenation( CSS/JS Optimization)
This will minify and combine your CSS and JavaScript files to improve load time.
CSS / JS Minify and combine
- Log on to the WP Dashboard and go to LiteSpeed Cache >Page Optimization. Transformed.execSQL
- Enable the following options:
- CSS Minify → After | Before Removes all unnecessary characters such as spaces, comments, new lines.. etc. from CSS files.
- CSS Combine – Combines multiple CSS files into one that again helps in reducing HTTP requests.
- Additionally: JSMinify — Minified JavaScript files
- Combine – for merging JS files.
- HTML Minify: This plugin helps lower file sizes by minification of HTML.
- CSS/JS Asynchronously Loading.
- Deferred 3rd party scripts using the Enable JS/CSS Async Load plugin which can optimize the load speed of styles and js files that are render blocking.
- Load CSS/JS deferred: It will postpone the loading of css/js, Once our page is loaded with improved performance.
Important Note:
Make sure you test your site carefully after using these settings to verify the combined/minified files are not breaking your layout or functionality.
6. Database Optimization
A bloated WordPress database can slow down your site. LiteSpeed Cache offers tools to clean up and optimize the database.
Database Settings:
- Navigate to LiteSpeed Cache → Database.
- Here you will see a number of options for response text.
- WP Optimize (Best Settings) acts as a plugin to: Clean All Post Revisions — There is no need of keeping revisions of your posts.
- Purge Auto Drafts: Deletes autosaved drafts.
- Delete Trashed Posts: Delete trashed posts.
- Optimize Tables : This option will run optimization queries to your database to increase the performance.
- Optimize: can be used to clean up a database.
You can also just schedule the optimization to run every now and then on your database making sure that is as light as possible.
7. Object Caching
Object caching caches database queries and objects that your players do. It can help to increase the speed of dynamic sites as a whole.
Object Cache Settings:
- Find your way to LiteSpeed Cache > Cache > Object.
- If your hosting provider supports Redis or Memcached then activate Object Cache.
- Set the Object Cache TTL to specify a cache target length (default is 360 seconds).
- Before you enable this feature, make sure your hosting supports Redis or Memcached.
8. Integration with a CDN (Content Delivery Network)
Compatible with Cloudflare CDN (Preloaded) and QUIC Cloud cloud. A CDN (content delivery network) stores your static content in many places worldwide, and serves it from the nearest server to visitors for faster web page load times.
- Cloudflare installation in LiteSpeed
- Go to LiteSpeed Cache > CDN.
- Enable Use CDN.
- In Cloudflare fill out the details (API Key, Zone ID etc. ).
For QUIC. You have to deploy the cloud CDN which will get directly integrated with LiteSpeed and you can also use this from QUIC. LiteSpeed Cache Settings -> Cloud Tab
9. Heartbeat Control
The WordPress Heartbeat API, which operates in the background, has a tendency to utilize server resources unbeknownst to you. LiteSpeed Cache enables you to control the Heartbeat API which is a key feature of keeping server load in check.
Heartbeat Control Settings:
- Navigate to LiteSpeed Cache > Settings > Heartbeat
- Control Heartbeat : Turn this on and set how often the Heartbeat API should run. E.g., you can decrease its execution on posts and pages to save server resources.
10. Advanced settings: HTTP/2 Push & Browser Cache
The HTTP/2 Server Push feature allows the server to push assets to the user browser before they have even requested them, which vastly improves load times.
- Enable HTTP/2 Push.
- Navigate to LiteSpeed Cache > the cache section in your admin panel > click on Advanced
- Enable HTTP/2 Push. This way we can get CSS, JavaScript etc quickly loaded on the browser.
11. Optimize Your Site Speed and Testing
After setting up LiteSpeed Cache, you need to track your site performance to check if the optimisations are working properly.
Test Your Site:
Check back on GTMetrix, Google PageSpeed Insights, and Pingdom to see how much faster your site has become. Always test to see whether it may slow down your website or any other issue.
LiteSpeed Cache is an all-in-one plugin that could take care of all your laptop speed optimization needs. Chache, compress file size, optimize images and use CDN — doing this ensures your site not only loads super fast but also it helps your SEO ranking.
