Custom HTML plugins on your websites improve its overall functionalities and user experience. Here’s are easy steps to help you create and integrate custom HTML plugins:
Step 1: Define the Purpose of Your Plugin
Before starting, clearly define what you are doing and the purpose of your plugin. For example:
- Add a custom contact form.
- Display dynamic content.
- Integrate a third-party service.
- Create a custom widget (e.g., a weather widget).
Step 2: Plan the Plugin Structure
Decide how your plugin will integrate with your website:
- Standalone HTML/CSS/JS: A simple plugin that can be embedded directly into your site.
- Reusable Component: A plugin that can be used across multiple pages or websites.
- Dynamic Plugin: A plugin that interacts with a backend or API.
Step 3: Write the HTML
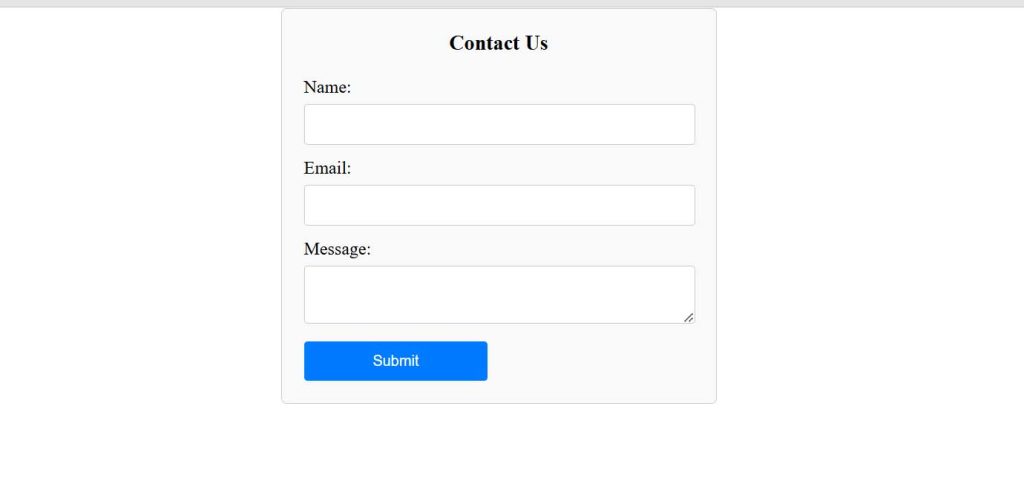
Create the basic structure of your plugin using HTML. For example, if you’re creating a custom contact form:
<!doctype html>
<html class="no-js" lang="zxx">
   <head>
      <meta charset="utf-8">
      <meta http-equiv="x-ua-compatible" content="ie=edge">
      <title>Creating custom HTML plugin</title>

      <!-- CSS here -->
      <link rel="stylesheet" href="style.css">

   </head>
   <body>
      <div class="custom-contact-form">
         <h3>Contact Us</h3>
         <form id="contactForm">
            <label for="name">Name:</label>
            <input type="text" id="name" name="name" required>

            <label for="email">Email:</label>
            <input type="email" id="email" name="email" required>

            <label for="message">Message:</label>
            <textarea id="message" name="message" required></textarea>

            <button type="submit">Submit</button>
          </form>
      </div>

      <!-- JS here -->
      <script src="main.js"></script>
   </body>
</html>
Step 4: Add CSS for Styling
Style your plugin using CSS to ensure it matches your website’s design. For example:
*{
    padding: 0px;
    margin: 0px;
}

.custom-contact-form {
    max-width: 350px;
    margin: 0 auto;
    padding: 20px;
    border: 1px solid #ccc;
    border-radius: 5px;
    background-color: #f9f9f9;
}

.custom-contact-form h3 {
    text-align: center;
    margin-bottom: 20px;
}

.custom-contact-form form{
	padding-right: 20px;
}

.custom-contact-form input,
.custom-contact-form textarea {
    width: 100%;
    padding: 10px;
    margin: 6px 0px 12px;
    border: 1px solid #ccc;
    border-radius: 3px;
    margin-right: 20px;
}

.custom-contact-form button {
    width: 50%;
    padding: 10px;
    background-color: #007bff;
    color: white;
    border: none;
    border-radius: 3px;
    cursor: pointer;
}

.custom-contact-form button:hover {
    background-color: #0056b3;
}
Step 5: Add JavaScript for Interactivity
If your plugin requires interactivity (e.g., form submission, dynamic content), use JavaScript. For example:
document.getElementById('contactForm').addEventListener('submit', function(event) {
    event.preventDefault(); // Prevent form submission

    // Get form data
    const name = document.getElementById('name').value;
    const email = document.getElementById('email').value;
    const message = document.getElementById('message').value;

    // Validate data (optional)
    if (!name || !email || !message) {
        alert('Please fill out all fields.');
        return;
    }

    // Send data to a server or API (example using Fetch API)
    fetch('https://your-server.com/submit-form', {
        method: 'POST',
        headers: {
            'Content-Type': 'application/json',
        },
        body: JSON.stringify({ name, email, message }),
    })
    .then(response => response.json())
    .then(data => {
        alert('Form submitted successfully!');
        document.getElementById('contactForm').reset(); // Clear form
    })
    .catch(error => {
        console.error('Error:', error);
        alert('An error occurred. Please try again.');
    });
});
Step 6: Make the Plugin Reusable
To make your plugin reusable across multiple pages or websites:
- Encapsulate the Code: Wrap your HTML, CSS, and JavaScript in a single file or component.
- Use a Framework: If your website uses a framework like React, Vue, or Angular, create a component for your plugin.
- Externalize Resources: Store your CSS and JavaScript in separate files and link them in your HTML.
Step 7: Test Your Plugin
- Test your plugin on different browsers and devices to ensure compatibility.
- Check for responsiveness and usability.

Step 8: Integrate the Plugin into Your Website
- Embed Directly: Copy and paste the HTML, CSS, and JavaScript into your website’s code.
- Use a Script Tag: If your plugin is in a separate JavaScript file, include it using a <script> tag.
By using this, the functionality of your website can be improved, as well as the overall user experience and feel by building custom HTML plugins using these instructions.

