Close Menu

    Subscribe to Updates

    Get the latest creative news from FooBar about art, design and business.

    What's Hot

    Creating custom HTML plugins for your website

    March 2, 2025

    WooCommerce Deposits and Partial Payments WordPress Plugin.

    February 26, 2025

    How to display API data on WordPress frontend using shortcode?

    February 25, 2025
    Facebook X (Twitter) Instagram
    • Privacy Policy
    • Disclaimer
    • Contact Us
    Facebook X (Twitter) LinkedIn Instagram YouTube
    Geeks Lab TechnologyGeeks Lab Technology
    Demo
    • Home
    • HTML/ CSS
      1. HTML
      2. CSS
      3. Bootstrap
      4. Tailwind
      5. Sass
      6. View All

      Creating custom HTML plugins for your website

      March 2, 2025

      HTML to Laravel Blade with CSS Assets

      October 23, 2024

      A Beginner’s Guide to PHP

      October 16, 2024

      How Convert a static HTML/CSS site to React App

      October 10, 2024

      Box Shadow vs Drop Shadow for Image in HTML and CSS

      October 10, 2024

      How to Set Up Tailwind CSS with Vite and React: A Step-by-Step Guide

      October 2, 2024

      Getting Started with Tailwind CSS: A Beginner’s Guide

      October 2, 2024

      Creating Header / Navbar with Bootstrap

      October 1, 2024

      Learn Bootstrap

      September 30, 2024

      How to Set Up Tailwind CSS with Vite and React: A Step-by-Step Guide

      October 2, 2024

      Getting Started with Tailwind CSS: A Beginner’s Guide

      October 2, 2024

      Minifing Sass CSS For Your Website Speed

      October 9, 2024

      Mastering in Sass: A Beginner’s Guide Improvements to Your CSS Work process

      October 9, 2024

      Creating custom HTML plugins for your website

      March 2, 2025

      How to use JQuery Swipe Slider?

      February 17, 2025

      How to Use OWL Carousel?

      February 17, 2025

      How to Integrate jQuery Magnifying Popup?

      February 17, 2025
    • WordPress
      1. WordPress CMS
      2. WordPress themes
      3. WordPress Plugins
      4. WooCommerce
      5. Tutorials
      6. WP Page Builders
      7. WP Speed Optimize
      8. View All

      WordPress Security in Easy Steps (No Coding)

      February 13, 2025

      How to add Custom Class and ID in Contact Form 7

      December 30, 2024

      How to Generate Automatic WooCommerce QR Code

      December 23, 2024

      Translate WordPress Website Using GTranslate Plugins

      December 22, 2024

      WordPress Security in Easy Steps (No Coding)

      February 13, 2025

      All About WordPress Child Theme

      February 11, 2025

      How to Fix 500 Internal Server Error in WordPress Website

      December 18, 2024

      How to fix the WordPress White Screen of Death (WSOD) Issue on Website

      December 18, 2024

      WooCommerce Deposits and Partial Payments WordPress Plugin.

      February 26, 2025

      WordPress Security in Easy Steps (No Coding)

      February 13, 2025

      How to set up the country flag and phone numbers in contact form 7?

      January 30, 2025

      How To Check WordPress Website Health And Improve It?

      January 28, 2025

      WooCommerce Deposits and Partial Payments WordPress Plugin.

      February 26, 2025

      How to Generate Automatic WooCommerce QR Code

      December 23, 2024

      How to setup and Configure WP Mail SMTP Plugin in WordPress

      December 15, 2024

      WooCommerce Tips: How to Make users purchase only one product per order

      October 23, 2024

      WooCommerce Deposits and Partial Payments WordPress Plugin.

      February 26, 2025

      How to display API data on WordPress frontend using shortcode?

      February 25, 2025

      Create Tables in Elementor

      January 7, 2025

      How to add Custom Class and ID in Contact Form 7

      December 30, 2024

      How to Customize the “Add to Cart” Button Text in WooCommerce

      October 15, 2024

      Best WordPress Page Builders: Enhance Your Website with Ease

      October 9, 2024

      Elementor Page Builder Loading Problem

      October 7, 2024

      How to Fix 500 Internal Server Error in WordPress Website

      December 18, 2024

      How to Optimize and Compress Images in WordPress

      October 14, 2024

      The Ultimate Popular WordPress Speed Optimization Plugins – 2025

      October 9, 2024

      WordPress Lite Speed Cache Plugin For Speed Optimization

      October 9, 2024

      WooCommerce Deposits and Partial Payments WordPress Plugin.

      February 26, 2025

      How to display API data on WordPress frontend using shortcode?

      February 25, 2025

      WordPress Security in Easy Steps (No Coding)

      February 13, 2025

      All About WordPress Child Theme

      February 11, 2025
    • PHP
      1. PHP Tutorials
      2. MySql
      3. View All

      PHP Variables in Detail

      October 17, 2024

      A Beginner’s Guide to PHP

      October 16, 2024

      Multi-Level Menu Like Primary Category and Sub Category Menu using PHP MySQL

      January 28, 2025

      How to connect PHP and MySQL Database?

      January 23, 2025

      How to display API data on WordPress frontend using shortcode?

      February 25, 2025

      Multi-Level Menu Like Primary Category and Sub Category Menu using PHP MySQL

      January 28, 2025

      How to connect PHP and MySQL Database?

      January 23, 2025

      PHP Variables in Detail

      October 17, 2024
    • Laravel
      1. Laravel Beginners
      2. Laravel Tutorials
      3. View All

      Laravel Eloquent Relationships: An Advanced Guide

      November 19, 2024

      Laravel 11 Send Email Via Notification

      November 14, 2024

      How to Add Toastr Notification in Laravel 11?

      November 14, 2024

      Laravel 10 Generate Test or Dummy Data using Factory Tinker

      November 13, 2024

      Clear Laravel cache in different ways

      October 21, 2024

      Laravel Eloquent Relationships: An Advanced Guide

      November 19, 2024

      Laravel 11 Send Email Via Notification

      November 14, 2024

      How to Add Toastr Notification in Laravel 11?

      November 14, 2024

      Laravel 10 Generate Test or Dummy Data using Factory Tinker

      November 13, 2024
    • JavaScript
      1. React Js
      2. View All

      Password and Confirm Password Validation in React JS

      November 12, 2024

      Username and Password Validation in React JS

      November 11, 2024

      How Convert a static HTML/CSS site to React App

      October 10, 2024

      How to Set Up Tailwind CSS with Vite and React: A Step-by-Step Guide

      October 2, 2024

      Creating custom HTML plugins for your website

      March 2, 2025

      How to use JQuery Swipe Slider?

      February 17, 2025

      How to Use OWL Carousel?

      February 17, 2025

      How to Integrate jQuery Magnifying Popup?

      February 17, 2025
    • Contact
    Geeks Lab TechnologyGeeks Lab Technology
    Home»Editors Choice»Password and Confirm Password Validation in React JS
    Editors Choice

    Password and Confirm Password Validation in React JS

    GeeksLab TechnologyBy GeeksLab TechnologyNovember 12, 2024Updated:November 12, 2024No Comments5 Mins Read9 Views
    Facebook Twitter Pinterest LinkedIn Telegram Tumblr Email
    Share
    Facebook Twitter LinkedIn Pinterest Email

    It is very important that password fields on web forms are safe and easy to use. One way to improve security is to use “password” and “confirm password” validation.In this guide, we will show you how to make a React component that checks input fields.

    Step 1: Install and Set Up Your React App

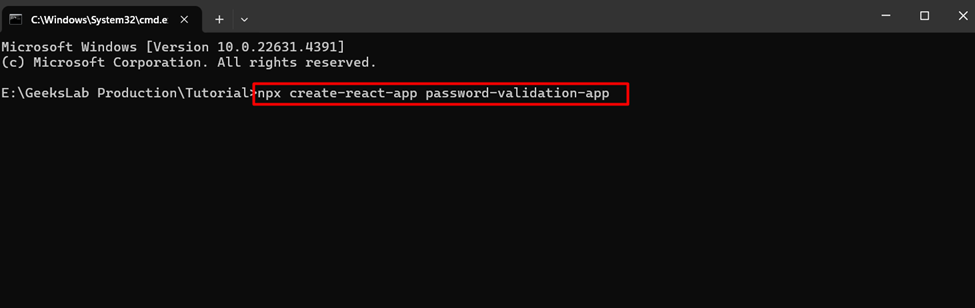
    First, open CMD, run this command, and create a new React app.

    
    npx create-react-app password-validation-app
    

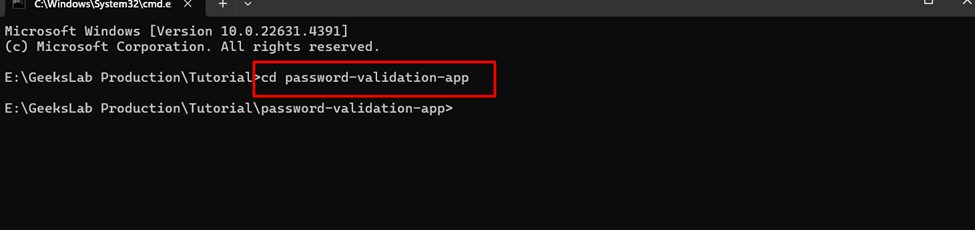
    Step 2: Go to the project folder :

    
    cd password-validation-app
    

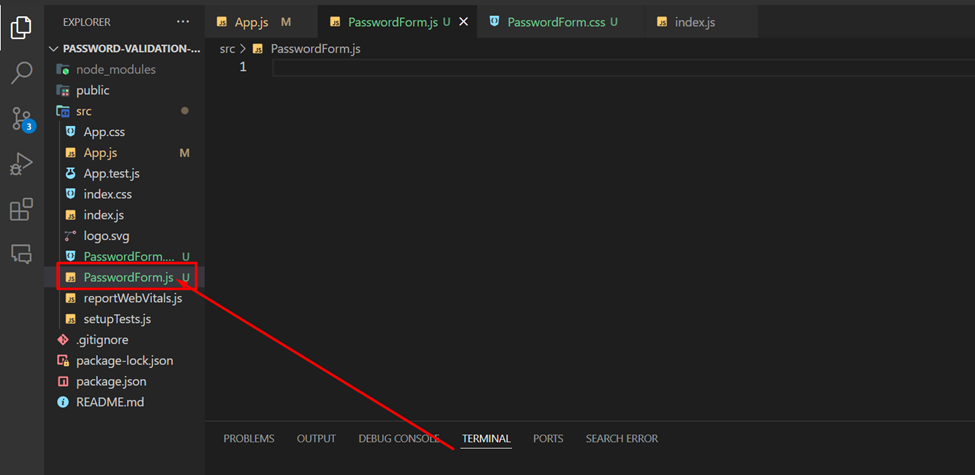
    Step 3: Set up the Form Component :

    Go to the src folder. In the src folder, create a new file named PasswordForm.js.

    Step 4: Paste this code :

    I breakdown this code before pasting: 👇

    1. Importing necessary libraries and styles: Setting up React, useState, and a custom CSS file by importing the necessary libraries and styles.
    2. Primary function: Sets up the PasswordForm function component.
    3. State for input values and errors: Initializes input and errors as state variables for managing form data and validation error messages.
    4. Handle changes in input fields: Defines handleChange, which updates input state whenever a user types in any form field.
    5. Handle form submission: Defines handleSubmit to prevent page reload, validate the form, and reset fields on successful validation.
    6. Validate form inputs: Defines validate to check:
    7. Name field (required),
    8. Email format and requirement,
    9. Password requirement and match with confirm password.
    10. Name validation – required field: Ensures the name field is filled in.
    11. Email validation – required and must match email format: Checks for a valid email address format if an email is provided.
    12. Password validation – required field: Confirms the password field is not empty.
    13. Confirm Password validation – required and must match password: Ensures that the confirm password field matches the password field.
    14. Set error messages if any: Updates errors state with validation errors.
    15. Render form with inputs and error messages: Renders the form with each input field and displays validation error messages, plus a submit button.

    Then paste this code in PasswordForm.js file.👇

    
    import React, { useState } from 'react';
    import './PasswordForm.css';
    
    function PasswordForm() {
      const [input, setInput] = useState({ name: '', email: '', password: '', confirmPassword: '' });
      const [errors, setErrors] = useState({});
    
      const handleChange = (event) => {
        const { name, value } = event.target;
        setInput({ ...input, [name]: value });
      };
    
      const handleSubmit = (event) => {
        event.preventDefault();
        if (validate()) {
          alert('Form submitted successfully!');
          setInput({ name: '', email: '', password: '', confirmPassword: '' });
        }
      };
    
      const validate = () => {
        const newErrors = {};
        let isValid = true;
    
        if (!input.name) {
          isValid = false;
          newErrors.name = 'Please enter your name.';
        }
    
        if (!input.email) {
          isValid = false;
          newErrors.email = 'Please enter your email address.';
        } else {
          const emailPattern = /^[a-zA-Z0-9._%+-]+@[a-zA-Z0-9.-]+\.[a-zA-Z]{2,}$/;
          if (!emailPattern.test(input.email)) {
            isValid = false;
            newErrors.email = 'Please enter a valid email address.';
          }
        }
    
        if (!input.password) {
          isValid = false;
          newErrors.password = 'Please enter your password.';
        }
    
        if (!input.confirmPassword) {
          isValid = false;
          newErrors.confirmPassword = 'Please confirm your password.';
        } else if (input.password !== input.confirmPassword) {
          isValid = false;
          newErrors.password = "Passwords don't match.";
        }
    
        setErrors(newErrors);
        return isValid;
      };
    
      return (
        <div className="form-container">
          <h2>Password and Confirm Password Validation in React JS</h2>
          <form onSubmit={handleSubmit}>
            <div className="form-group">
              <label>Name:
              <input
                type="text"
                name="name"
                value={input.name}
                onChange={handleChange}
                placeholder="Enter name"
              />
            </label>
              <div className="error">{errors.name}</div>
            </div>
    
            <div className="form-group">
              <label>Email:
              <input
                type="email"
                name="email"
                value={input.email}
                onChange={handleChange}
                placeholder="Enter email"
              />
            </label>
    
              <div className="error">{errors.email}</div>
            </div>
    
            <div className="form-group">
              <label>Password:
              <input
                type="password"
                name="password"
                value={input.password}
                onChange={handleChange}
                placeholder="Enter password"
              />
            </label>
              <div className="error">{errors.password}</div>
            </div>
    
            <div className="form-group">
              <label>Confirm Password:
              <input
                type="password"
                name="confirmPassword"
                value={input.confirmPassword}
                onChange={handleChange}
                placeholder="Confirm password"
              />
            </label>
              <div className="error">{errors.confirmPassword}</div>
            </div>
    
            <button type="submit" className="submit-btn">Submit</button>
          </form>
        </div>
      );
    }
    
    export default PasswordForm;


    Step 5: Add Custom CSS

    Create a CSS file to style your form. This file’s name is PasswordForm.css in the src folder for custom styling. Add the following code and paste it on this file:

    
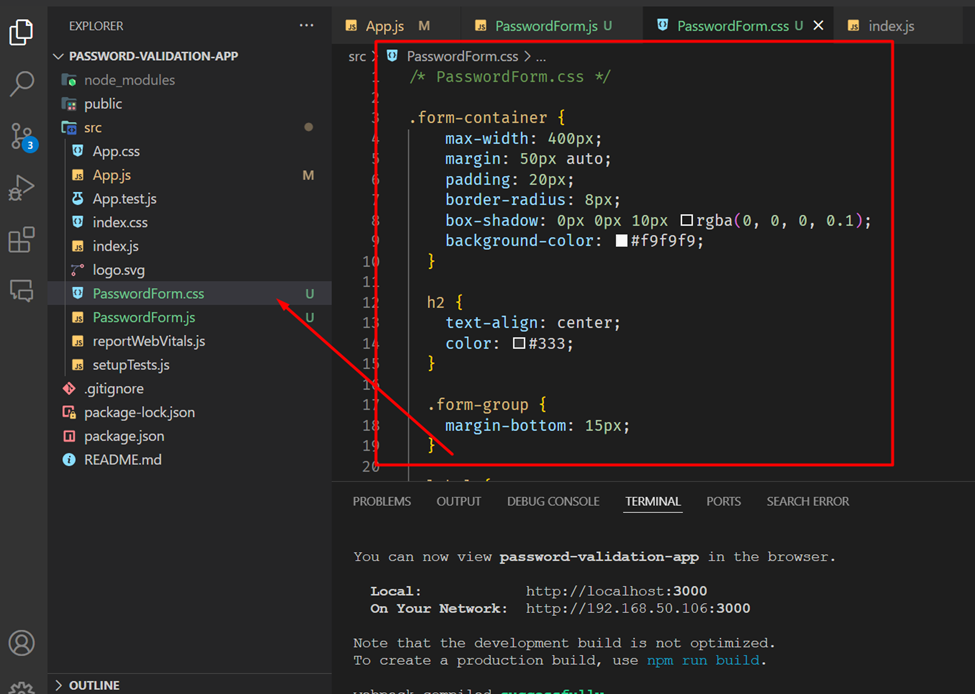
    /* PasswordForm.css */
    
    .form-container {
      max-width: 400px;
      margin: 50px auto;
      padding: 20px;
      border-radius: 8px;
      box-shadow: 0px 0px 10px rgba(0, 0, 0, 0.1);
      background-color: #f9f9f9;
    }
    
    h2 {
      text-align: center;
      color: #333;
    }
    
    .form-group {
      margin-bottom: 15px;
    }
    
    label {
      font-weight: bold;
      display: block;
      margin-bottom: 5px;
      color: #333;
    }
    
    input[type="text"],
    input[type="email"],
    input[type="password"] {
      width: 100%;
      padding: 8px;
      border: 1px solid #ccc;
      border-radius: 4px;
      font-size: 16px;
    }
    
    input[type="text"]:focus,
    input[type="email"]:focus,
    input[type="password"]:focus {
      outline: none;
      border-color: #007bff;
    }
    
    .error {
      color: #d9534f;
      font-size: 14px;
      margin-top: 5px;
    }
    
    .submit-btn {
      width: 100%;
      padding: 10px;
      border: none;
      background-color: #007bff;
      color: #fff;
      font-size: 16px;
      border-radius: 4px;
      cursor: pointer;
      transition: background-color 0.3s;
    }
    
    .submit-btn:hover {
      background-color: #0056b3;
    }


    Step 6: Import and Use the Component on your parent Component 

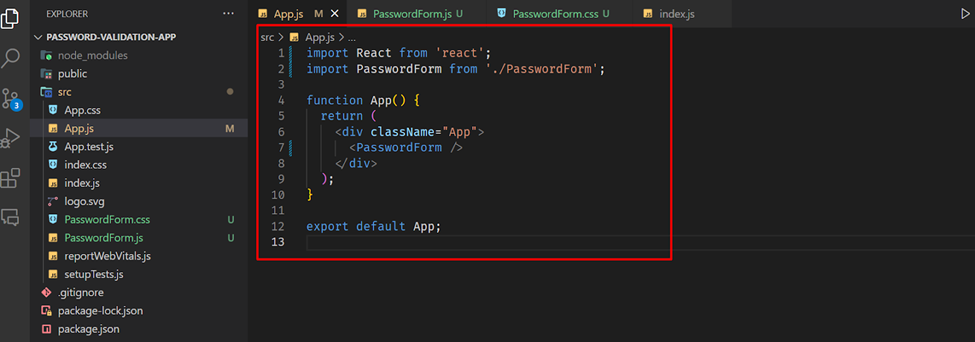
    In this case, my parent component is App.js. So, I import the PasswordForm component in App.js component.

    
    import React from 'react';
    import PasswordForm from './PasswordForm';
    
    function App() {
      return (
        <div className="App">
          <PasswordForm />
        </div>
      );
    }
    
    export default App;


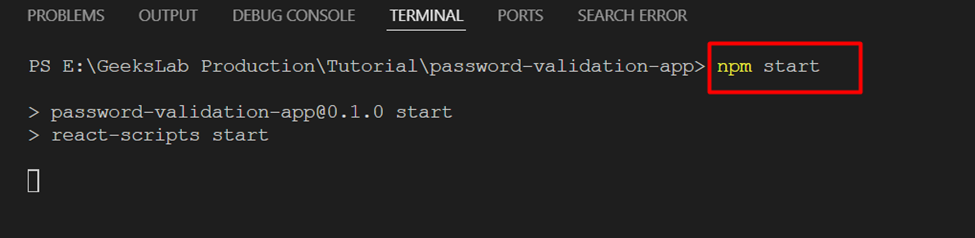
    Step 5: Run Application

    Finally, start the application by running this command :

    
    npm start
    

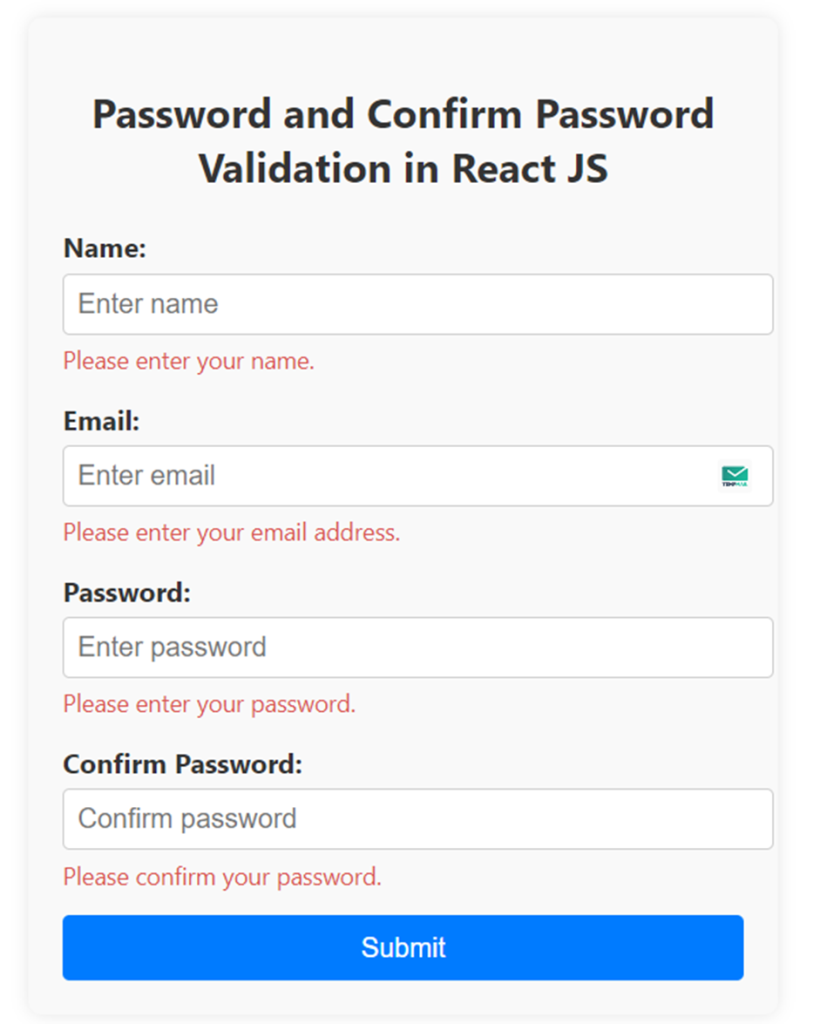
    Finally, you show like this form. 👇

    Conclusion

    This guide shows a full example of setting up password and confirm password validation in React JS and using custom CSS . Actually custom CSS use for the styling.

    password validation React JS
    Share. Facebook Twitter Pinterest LinkedIn Tumblr Email
    GeeksLab Technology
    • Website

    Related Posts

    Creating custom HTML plugins for your website

    March 2, 2025

    WooCommerce Deposits and Partial Payments WordPress Plugin.

    February 26, 2025

    How to display API data on WordPress frontend using shortcode?

    February 25, 2025

    How to use JQuery Swipe Slider?

    February 17, 2025

    How to Use OWL Carousel?

    February 17, 2025

    How to Integrate jQuery Magnifying Popup?

    February 17, 2025
    Leave A Reply Cancel Reply

    Demo
    Top Posts

    How Convert a static HTML/CSS site to React App

    October 10, 202450 Views

    How to Customize the “Add to Cart” Button Text in WooCommerce

    October 15, 202423 Views

    How to Set Up Tailwind CSS with Vite and React: A Step-by-Step Guide

    October 2, 202423 Views
    Don't Miss

    Creating custom HTML plugins for your website

    March 2, 2025

    Custom HTML plugins on your websites improve its overall functionalities and user experience. Here’s are…

    WooCommerce Deposits and Partial Payments WordPress Plugin.

    February 26, 2025

    How to display API data on WordPress frontend using shortcode?

    February 25, 2025

    How to use JQuery Swipe Slider?

    February 17, 2025
    Stay In Touch
    • Facebook
    • YouTube
    • TikTok
    • WhatsApp
    • Twitter
    • Instagram
    Latest Reviews
    Demo
    Geeks Lab Technology
    Facebook X (Twitter) Instagram Pinterest YouTube LinkedIn
    • About
    • Privacy Policy
    • Disclaimer
    • Contact Us
    © All Rights Reserved Geekslabtechnology 2024. Designed by Geekslab.

    Type above and press Enter to search. Press Esc to cancel.